Introduction
If you’ve managed Windows devices for any length of time, you know the power and the sprawl of Group Policy Objects (GPOs). For decades, they have been the bedrock of Windows configuration, security, and management. But as organizations embrace the cloud and move to modern management with Microsoft Intune, a critical question emerges “What about our GPOs?”
The thought of manually recreating hundreds, or even thousands, of policy settings in Intune is daunting. How do you know which settings are still relevant? Which ones are even available in Intune? This uncertainty is a major roadblock for many cloud migrations.
This is where Group Policy analytics comes in.
It’s a powerful, built-in tool in Microsoft Intune designed specifically to be the bridge from your on-premises past to your cloud-native future. It’s the starting point for rationalising your old policies and accelerating your move to modern management. In this post, we’ll dive into what this tool is, why it’s your new best friend, and a step-by-step guide on how to use it effectively.
What is Group Policy Analytics in Intune?
At its core, Group Policy analytics is exactly what it sounds like an analysis tool. It does not move or change any of your on-premises GPOs. Instead, it provides a translation service.
You feed it your on-premises GPOs (in the form of an XML export), and the tool analyses them against the massive library of settings available in Intune (specifically, the Settings Catalog).
The primary function of this tool is to answer these critical questions for every GPO you import:
- Is this policy supported in Intune?
- If so, what is the exact equivalent setting?
- If not, what’s the alternative?
It generates a clear, percentage-based report showing exactly how many settings in a GPO have a direct 1:1 mapping to a modern Intune setting, which are deprecated e.g.old Internet Explorer settings, and which are simply not supported. This report is your roadmap.
Why Use It? The ‘Why’ Before the ‘How’
Before we jump into the tutorial, let’s establish why this tool is the mandatory first step in any GPO migration strategy.
- It Builds Your Migration Plan: You can’t plan a journey without a map. This tool is the map. It gives you a complete inventory of your current state and its cloud compatibility, allowing you to prioritise which GPOs to migrate, which to rebuild, and which to retire.
- It’s an Opportunity to Rationalize This is a crucial point championed by many in the Microsoft community. Do not simply “lift and shift” decades of GPO guff. Your GPO environment likely has policies for long gone software, old security standards, or mapped drives that no longer exist. Group Policy analytics helps you identify this policy debt and use the migration as a spring cleaning opportunity.
- It Saves Massive Amounts of Time Imagine manually checking thousands of settings against the Intune Settings Catalog. The analytics tool automates this entire process, reducing weeks of manual, error prone research into a task that takes a few hours.
- It Identifies Gaps The report clearly flags settings with no direct MDM equivalent. This is not a failure; it’s a critical planning directive. It tells you exactly where you’ll need to find an alternative solution, such as a custom OMA-URI setting, a PowerShell script deployed via Intune, or simply retiring the setting altogether.
How to Use Group Policy Analytics – A Step-by-Step Guide
Let’s walk through the entire process, from your on-premises Domain Controller to a shiny new Intune Configuration Profile.
Phase 1: Exporting Your On-Premises GPOs
First, you need to get your GPOs out of Active Directory in a format Intune can read.
- Log in to a Windows Server or a Windows client device (like Windows 10 or 11) that has the Group Policy Management Console (GPMC) installed. This console is often run from a Domain Controller, but it can also be installed on other servers or client devices using the Remote Server Administration Tools (RSAT).
- Open GPMC. In the navigation pane expand Group Policy Objects, find the GPO you want to analyze.
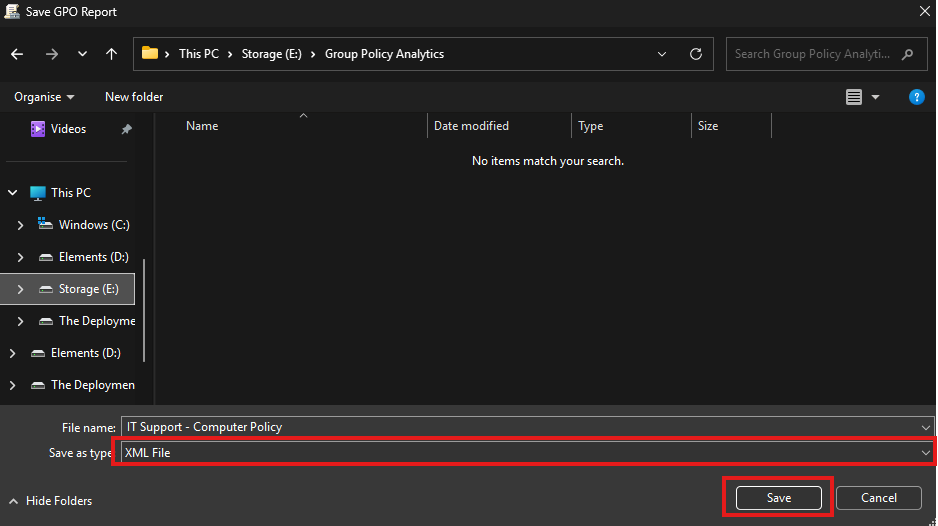
- Right-click the GPO and select Save Report.
- This is the most critical step: In the “Save as type” dropdown, select XML File (*.xml). The tool only accepts XML, not the default HTML.
- Save the file to a location you can easily access.
Tip: You can also export multiple GPOs. For a large-scale analysis, you can use the official Microsoft PowerShell script Get-GPOReport to export all GPOs in your domain to XML in one go.
Phase 2: Importing Your GPOs into Intune’s Group Policy Analytics
Now, let’s feed this XML file to Intune.
- Log in to the Microsoft Intune admin center.
- In the left-hand navigation pane, go to Devices > Group Policy analytics.
- At the top of the main pane, click the Import button.
- A fly-out pane will appear. Click the folder icon and select the XML file (or files) you exported in Phase 1. You can import multiple files at once.
- Click Next and then Create.
The import process will begin. Intune will upload the file, parse it, and cross-reference every setting against its CSP (Configuration Service Provider) database. This can take a few minutes, so be patient. You can refresh the screen to see the status.

Phase 3: Analyzing the Report in Group Policy Analytics
Once the analysis is complete your GPOs will appear in the list. This is where you get your insights.
You’ll see several key columns:
- Group Policy name: The name of your imported GPO.
- Active Directory Target: This is automatically generated from the GPO’s on-premises Organizational Unit (OU) target information.
- MDM Support: This is the big one. It’s a percentage e.g., 80%. This tells you what percentage of settings in this specific GPO have a direct, 1:1 equivalent in Intune.
- Unknown Settings: The percentage of settings the tool couldn’t identify.
- Targeted in AD: A Yes or No indicating if the GPO is linked to an OU in your on-premises Active Directory.
- Last imported: Shows the date of the last import.
Click on the MDM Support percentage for a GPO. This is where the real data is.

A new blade will open, showing you every single setting from the GPO, broken down into categories:
- Supported This is what you want to see! These settings have a direct equivalent. The tool will show you the exact CSP mapping and the OMA-URI.
- Not Supported These settings have no direct mapping in Intune’s built-in catalog. You will need to find an alternative for these.
- Deprecated These are legacy settings (e.g., for Internet Explorer 8) that are technically in Intune but are deprecated. You should not migrate these; you should retire them.

Phase 4: The Magic “Migrate” Button
This is the feature that makes Group Policy analytics truly powerful. It’s not just a report; it’s an action tool.
- In that same detailed report view (where you see Supported, Not Supported, etc.), go back to the Settings list.
- Click the Migrate button at the top.
- A new pane will appear. Select only the settings you wish to migrate. A good practice is to only select the Supported ones (obviously).
- Click Next.
- Review the settings and click Next
- Give your new profile a descriptive name e.g. Migrated – OneDrive Settings, and add a description and select Next.
- Skip the Scope tags tab (unless you use them).
- The next tab is Assignments. We will intentionally skip this step for now. Best practice is to never assign a new or migrated policy immediately without reviewing and testing it first. We will save the profile without any assignments and then test it methodically in the next phase.

Phase 5: Review, Assign, and Test
This is a critical final step. Do not assume the migration is a fire and forget process.
- Go to Devices > Configuration Profiles.
- Find the new profile you just created (the one with the “SettingsCatalog” type).
- Review it. Open the profile and double check all the settings. Ensure the values are correct and make sense in a cloud-native context.
- Assign it. Assign the new profile to a TEST GROUP first. Never, ever assign a newly migrated policy directly to All Users or All Devices.
- Test it. On a test device in your pilot group, force a sync and verify that the settings are applying correctly (check the event logs, registry, and application behavior).
- Once you’ve validated the new profile, you can decommission the corresponding on-premises GPO
- For your cloud-managed devices and gradually roll out the new Intune profile.
Beyond the “Lift and Shift”
Group Policy analytics is more than just a migration tool it’s a modernisation catalyst. As per the official Microsoft Learn documentation, its purpose is to help you move to the modern, more flexible CSP-based policy engine.
Your goal should not be to get to 100% GPO parity in Intune. That’s “lift and shift” thinking. Your goal should be to use this opportunity to build a clean, streamlined, and secure set of cloud-native policies. Retire what’s old, question what’s left, and migrate only what you truly need.
Want More Practical Intune & Entra Guides?
For other guides on Intune check out Intune Tutorials category on this site. I also post tutorials and expert tips on The Deployment Guy YouTube channel. We cover everything from the latest Intune features to the foundations of Entra ID security, all in clear, step-by-step videos.
Join the community and subscribe at https://www.youtube.com/@thedeploymentguy to stay up to date.