Overview: What is Microsoft Defender Credential Guard?
Microsoft Defender Credential Guard is a security feature that uses virtualization-based security to isolate secrets such as NTLM password hashes and Kerberos Ticket Granting Tickets. These credentials are stored in the Local Security Authority (LSA), and Credential Guard ensures they are protected from malware or unauthorized access even if the system is compromised.
Why use it?
- Prevents credential theft attacks like Pass-the-Hash or Pass-the-Ticket.
- Uses hardware-based security (UEFI, Secure Boot, TPM).
- Even though on by default in 22H2 onwards it can be manually turned off by users. Configuring with Intune prevents this
Step-by-Step Guide: Setting Up Credential Guard via Endpoint Security
Before you begin
Ensure devices meet the prerequisites—Windows 10/11 Enterprise or Education, UEFI with Secure Boot, TPM 1.2 or 2.0, and Virtualization enabled in BIOS.
Step 1: Sign in to Microsoft Intune Admin Center
- Go to https://intune.microsoft.com
- Sign in with your admin credentials
Step 2: Create a New Configuration Profile
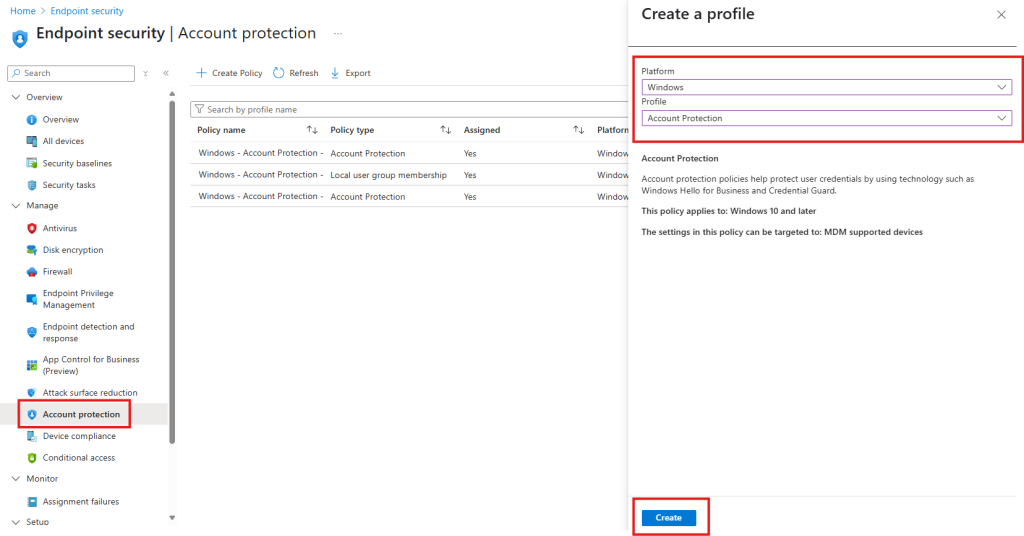
- In the left-hand menu, select Endpoint Security
- Under Manage select Account Protection
- Select Create Policy
- Under Platform select Windows
- Under Profile select Account Protection and then Create

Step 3: Policy Basics
- Give the policy a meaningful name such as Windows – Account Protection – Microsoft Defender Credential Guard
- Optional – I always like to give a brief description and provide a Microsoft Learn link that relates to this policy
- Select Next

Step 4: Configuration Settings
- Under Device Guard expand the Credential Guard drop down box
- Select (Enabled with UEFI lock) Turns on Credential Guard with UEFI lock
- Select Next

Step 5: Scope Tags
- Scope tags are optional but if you use them this is where you would set them
Step 6: Assignments
- Select the Search by group name text box
- You can either select All devices or groups of devices
- Select Next
- Select Save

Step-by-Step Guide: Setting Up Credential Guard via Device Configuration Policy
Step 1: Sign in to Microsoft Intune Admin Center
- Go to https://intune.microsoft.com
- Sign in with your admin credentials.
Step 2: Create a New Configuration Profile
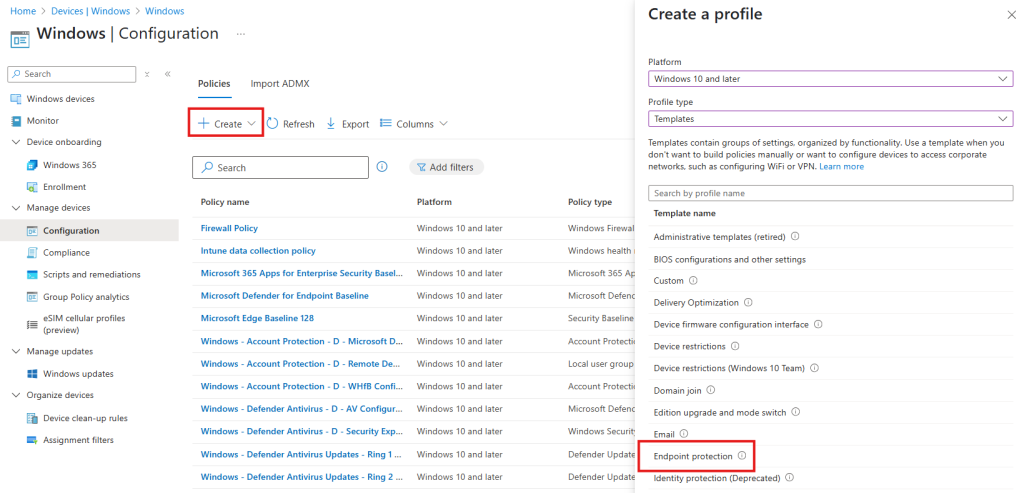
- In the left-hand menu, select Devices
- Under Platform select Windows
- Under Manage devices select Configuration
- Select Create Policy and then New Policy
- Under Platform select Windows
- Under Profile type select Templates
- Select Endpoint Protection
- Select Create

Step 3: Policy Basics
- Give the policy a meaningful name such as Windows – Device Configuration – Microsoft Defender Credential Guard
- Optional – I always like to give a brief description and provide a Microsoft Learn link that relates to this policy
- Select Next

Step 4: Configuration Settings
- Expand Microsoft Defender Credential Guard
- Select Enable with UEFI lock from the drop down box
- Select Next

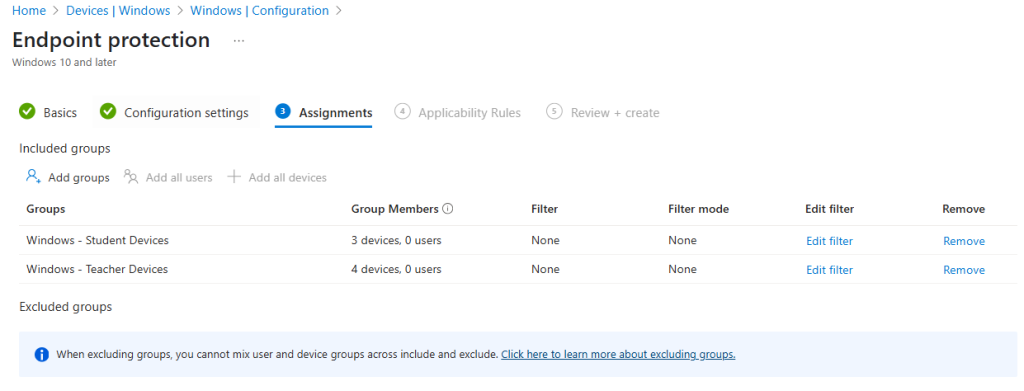
Step 5: Assignment
- You can either select Add all devices or Add groups and then browse and add the required groups
- Select Next

Step 6: Applicability Rules
- Under rule select Assign profile if
- Under Property select OS edition
- Under Value select both Windows 10/11 Enterprise and Windows 10/11 Education
- Select Next
- Select Create


