
Introduction
If you’ve ever had to repackage an entire Win32 application just because you fixed a typo in your install script, you know the pain. You make one small change to your PowerShell logic, fire up the Win32 Content Prep Tool, wait for it to wrap everything back into an .intunewin file, upload the whole lot again, and then sit there questioning your life choices while the progress bar crawls along.
Good news: as of January 2026, Microsoft has introduced a new Intune PowerShell script installer type for Win32 apps in Intune. Instead of burying your install script inside the encrypted package, you can now upload and edit it separately directly in the Intune admin centre. The script becomes part of the app’s metadata (just like a detection script), meaning you can tweak your installation logic without ever touching the .intunewin file again.
This guide walks you through how it works, how to set it up from scratch, and how to convert an existing Win32 app to use this new installer type. Let’s get on with it.
What’s Actually Changed?
Traditionally, deploying a Win32 app with a PowerShell install script meant including the .ps1 file inside your source folder, wrapping the whole lot into an .intunewin package, and then setting the install command to something like:
powershell.exe -ExecutionPolicy Bypass -File .\install.ps1That approach works, but it has a significant operational headache: any change to the script means repackaging and re-uploading the entire application binary. If you’re dealing with a large application (hello, Adobe), that’s a lot of wasted time and bandwidth.
With the new feature, when you create or edit a Win32 app, there’s now a dropdown on the Program page called Installer type. Set this to PowerShell script, and you get a script editor where you can upload (or paste) your install and uninstall scripts directly. Intune packages them alongside the app content and runs them in the same context as the traditional installer.
The key benefits are:
- Your PowerShell script is no longer locked inside the encrypted payload. It lives as editable metadata on the app object.
- Script changes no longer require repackaging. Edit the script, save, and Intune picks up the new version.
- Installation results still show as success or failure in the admin centre, based on your script’s return code.
- You can handle prerequisite checks, post-install configuration, registry tweaks, and file copies — all within one script.
💡 Good to Know The PowerShell script installer has a maximum script size of 50 KB. That’s plenty for most deployment scripts, but if you’re doing something spectacularly complex, keep an eye on file size. You can also use this feature with Enterprise App Management (EAM) apps to add pre- or post-install logic to pre-packaged catalogue apps.
Prerequisites
Before you start, make sure you’ve got the following sorted:
- A Microsoft Intune licence (included with Microsoft 365 E3/E5, Business Premium, or standalone Intune Plan 1)
- Intune Administrator or Global Administrator role in Microsoft Entra ID
- Target devices running Windows 10 1607 or later (Enterprise, Pro, or Education)
- Devices must be Microsoft Entra joined or registered and auto-enrolled in Intune
- The Microsoft Win32 Content Prep Tool downloaded from the official Microsoft GitHub repository (you still need an .intunewin file, even if the script does the heavy lifting)
- Your application source files in a clean, dedicated folder
⚠️ Heads Up – Multi-Admin Approval (MAA) If your tenant has Multi-Admin Approval enabled, you cannot upload PowerShell scripts during the initial app creation. You’ll need to create the app first (with a placeholder command line), then edit it afterwards to add the script. Microsoft has noted this will be updated in a future release.
Step-by-Step: Deploying a New Win32 App with a PowerShell Script Installer
Part 1 Prepare Your Source Files
First things first, get your folder structure in order. A tidy source folder now saves you from a chaotic mess later. Here’s a layout that works well:
C:\IntuneApps\7-Zip\

  ├── Tool\            # Extract the Win32 prep tool here

  ├── Source\          # Raw installer files only

  ├── Output\          # Your .intunewin file goes here

  ├── Scripts\         # Install/uninstall/detection scripts

  └── Documentation\   # Notes, changelogs, etc.
Place your raw installer (e.g., 7z2600-x64.exe) into the Source folder. Because the PowerShell script now lives separately in Intune, you do not need to include the install script in the Source folder any more. That’s the whole point.
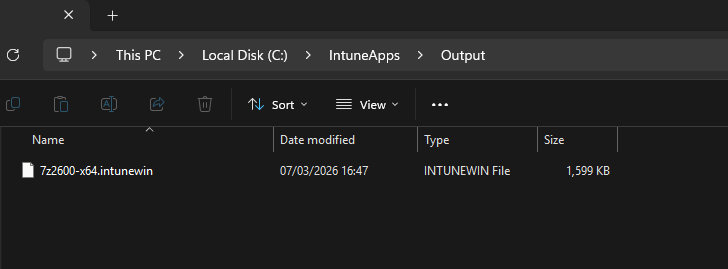
Part 2 Create the .intunewin Package
You still need to wrap your installer into an .intunewin file. The Intune Management Extension expects this format regardless of installer type.
Open a command prompt or PowerShell window and navigate to the folder containing the Win32 Content Prep Tool.
cd C:\IntuneApps\ToolRun the following command (adjusting paths to match your setup):
IntuneWinAppUtil.exe -c "C:\IntuneApps\Source" -s "7z2600-x64.exe" -o "C:\IntuneApps\Output"The tool will churn away and produce a file called 7z2600-x64.intunewin in your Output folder.
Quick Tip The Content Prep Tool packages every file in the source directory you point it at. If you’ve accidentally left your holiday photos in there, you’re going to have a very large .intunewin file and some explaining to do. Keep it clean.
Part 3 Write Your Install and Uninstall Scripts
Now, create the PowerShell scripts that will handle installation and removal. Save these in your Scripts folder for reference, but remember you’ll upload them directly to Intune rather than bundling them in the package.
Install script example (Install-7Zip.ps1):
# Install-7Zip.ps1 - Silent install for 7-Zip
# The Deployment Guy - thedeploymentguy.co.uk

# Run the installer silently from the working directory
# Using Start-Process with -Wait ensures Intune doesn't jump to detection
# before the install has actually finished
$Process = Start-Process -FilePath ".\7z2600-x64.exe" -ArgumentList "/S" -Wait -PassThru

# Return the exit code so Intune can report success or failure
exit $Process.ExitCode
Uninstall script example (Uninstall-7Zip.ps1):
# Uninstall-7Zip.ps1 - Silent uninstall for 7-Zip
# The Deployment Guy - thedeploymentguy.co.uk

# Run the uninstaller silently
$Process = Start-Process -FilePath "C:\Program Files\7-Zip\Uninstall.exe" -ArgumentList "/S" -Wait -PassThru

# Return the exit code so Intune can report success or failure
exit $Process.ExitCode
⚠️ Why Start-Process -Wait? You might be tempted to just call .\7z2409-x64.exe /S directly. The problem is that some EXE installers fork a child process and the parent exits immediately. If that happens, Intune thinks the install is done and runs your detection rules before the actual installation has finished resulting in a false failure. Using Start-Process with -Wait and -PassThru ensures the script blocks until the installer genuinely completes, and captures the real exit code.
Part 4 Add the App to Intune
Right, time to put it all together in the Intune admin centre.
- Sign in to the Microsoft Intune admin centre (intune.microsoft.com).
- Go to Apps > All Apps > Create.
- Under Select app type, choose Windows app (Win32) and click Select.
- Click Select app package file and upload the .intunewin file you created earlier. Click OK.
- On the App information page, fill in the details — name, description, publisher, and so on. Click Next.
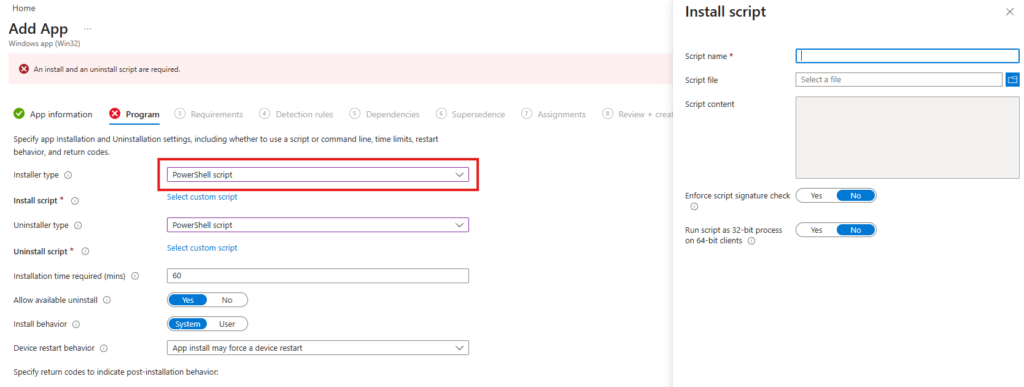
- Here’s where the magic happens. On the Program page:
- Important: Type any character into the Install command field first. There’s a known UI quirk where the Installer type dropdown stays greyed out until you do this.
- Change the Installer type dropdown from Command line to PowerShell script.
- A script upload section will appear. Upload your Install-7Zip.ps1 as the install script.
- Upload your Uninstall-7Zip.ps1 as the uninstall script.

- Set the Install behaviour to System (for a machine-wide install) and configure your preferred Device restart behaviour. Click Next.
- On the Requirements page, set the Operating system architecture to 64-bit and the Minimum operating system to your organisation’s baseline (e.g., Windows 10 21H2). Click Next.
Part 5 Configure Detection Rules
Detection rules tell Intune whether the app is already installed. Get these wrong and you’ll end up in a fun loop of Intune reinstalling the app every sync cycle. Not ideal.
- On the Detection rules page, set Rules format to Manually configure detection rules.
- Click + Add.
- Set the Rule type to File.
- Configure the following:
- Path: C:\Program Files\7-Zip
- File or folder: 7z.exe
- Detection method: File or folder exists
- Associated with a 32-bit app on 64-bit clients: No

- Click OK, then Next.
- Skip through Dependencies and Supersedence unless you have specific requirements, then click Next on each.
- On the Scope tags page, add any relevant tags for your environment (or skip if you’re not using them). Click Next.
Part 6 Assign the Application
- On the Assignments page, configure your groups:
- Required: Add a Microsoft Entra group for devices or users that must have this app.
- Available for enrolled devices: Add All Users (or a specific group) so users can self-serve from the Company Portal.
- Uninstall: Create and assign an uninstall group. Even if it’s empty now, having it ready means you can quickly remove the app later without faffing around with new assignments.
- Click Next, review the summary, and click Create.
That’s it. Your Win32 app is now deployed using the PowerShell script installer. Intune will push the .intunewin content to devices and execute your uploaded script as the installer.
Converting an Existing Win32 App
Already have a Win32 app deployed with a traditional command-line installer? You can switch it over without creating a new app object.
- Navigate to Apps > All Apps and click on the existing Win32 app.
- Click Properties.
- Click Edit next to the Program section.
- Change the Installer type dropdown to PowerShell script and upload your scripts.
- Click Review + Save.
The existing .intunewin package stays in place. The only thing changing is how Intune triggers the installation. Your detection rules, assignments, and everything else remain untouched.
Things to Watch Out For
The UI quirk: When creating a brand-new Win32 app, the Installer type dropdown appears greyed out. Type any character into the Install command text box and it will spring to life. It’s a known bug mildly annoying, but easy to work around.
Script size limit: The maximum script size is 50 KB. That’s more than enough for most deployments. If you find yourself bumping up against it, consider whether your script is trying to do too much and whether some of that logic belongs in a separate remediation or configuration profile.
Multi-Admin Approval: If MAA is enabled on your tenant, you can’t upload scripts during initial app creation. Create the app first, then edit to add scripts. Microsoft has said this behaviour will change in a future update.
32-bit vs 64-bit: The script editor now includes a toggle for running scripts in a 32-bit or 64-bit context. Make sure this matches your application’s requirements. If in doubt, leave it on 64-bit.
Verifying It Actually Worked
You’ve deployed the app. The Intune portal says it’s assigned. But did it actually install? Here’s how to check:
In the Intune admin centre: Navigate to Apps > All Apps, click on your app, and check the Device install status and User install status tabs. You should see a clear success or failure status for each device.
Quick verification on the device: Open PowerShell and run a quick check to confirm the app is present:
Test-Path "C:\Program Files\7-Zip\7z.exe"
If that returns True, you’re golden.
Wrapping Up
The PowerShell script installer for Win32 apps is one of those quiet quality-of-life improvements that will save you genuine time and frustration. No more repackaging for script tweaks. No more hunting for the original source files because someone forgot to back up the .intunewin. Just clean, editable scripts living right where you need them.
It’s particularly brilliant if you’re in a regulated industry where compliance steps are baked into your install process, or if you’re managing a fleet of applications where the install logic changes more often than the binaries themselves.
Give it a go on a test app first, get comfortable with the workflow, and then start migrating your existing apps over. Future-you will be thankful.
Happy deploying, and may your return codes always be zero.
— The Deployment Guy
Add and Assign Win32 Apps to Microsoft Intune – Microsoft Intune | Microsoft Learn