The Enrollment Status Page (ESP) is the progress screen a Windows device shows during Autopilot provisioning. It tracks policy, certificate, and app installation in real time and when configured correctly holds the device at that screen until everything critical has finished. Get it wrong and users end up with half-provisioned machines. Get it right and they receive a fully configured, compliant device the moment they hit the desktop.
This guide covers every setting in an ESP profile, in the order they appear in the Intune admin centre. It includes the exact setting label, the available options, the default value, and a recommended configuration for corporate-managed device deployments.
Prerequisites
- Microsoft Intune Plan 1.
- Windows Autopilot deployment profiles configured and assigned.
- Apps assigned as Required to the device and/or user groups used in your Autopilot profiles. The ESP can only track assigned apps and unassigned apps are invisible to it.
- Global Administrator, Intune Administrator, or Policy and Profile Manager role.
The Default ESP Profile
Every Intune tenant has one default ESP profile that cannot be deleted. It applies to all Autopilot devices that do not match a custom ESP profile. Out of the box, the default profile shows the ESP screen but does not block device use. For most managed environments this is not sufficient, so you create one or more custom profiles targeted at your Autopilot device groups.
Custom ESP profiles are prioritised by a number you assign. The profile with the lowest number (closest to 1) takes precedence when multiple profiles match a device. You can create up to 50 custom profiles.
The Two ESP Phases
The ESP operates across two phases, and some settings only apply in specific phases. Understanding the distinction is important before configuring anything.
Phase 1: Device Setup
The Device Setup phase runs before any user logs in. It tracks device-targeted items such as configuration profiles, compliance policies, certificates, and apps assigned to device groups. In Self-Deploying mode and during the Technician Flow in Pre-Provisioning, this is the only phase there is no user, so there is no Account Setup.
Phase 2: Account Setup
The Account Setup phase runs after the user signs in during the OOBE. It tracks user-targeted items such as user configuration profiles and apps assigned to user groups. This phase only runs in User-Driven Autopilot mode. The user sees the ESP again after signing in, showing the progress of their personalisation apps and policies.
| Note: When troubleshooting, the phase in which the failure occurred immediately narrows the scope. Device Setup failures point to device-assigned items. Account Setup failures point to user-assigned items. Check C:\Windows\Temp\IntuneManagementExtension\Logs for the ESP provisioning log, or review Devices > Monitor > Enrollment failures in the Intune admin centre. |
Creating an ESP Profile
- In the Intune admin centre, go to Devices > Windows > Enrollment > Enrollment Status Page.
- Select Create.
- On the Basics tab, enter a name and description. Select Next.
- On the Settings tab, configure all options as described below. Select Next.
- On the Assignments tab, assign to your Autopilot device groups. Select Next.
- Add Scope tags if required, then select Next and Create.
All ESP Settings: Full Reference
The table below lists all 11 settings in the order they appear in the Intune profile. Settings 2 through 11 are only visible once setting 1 is set to Yes. Setting 11 only appears once setting 10 is set to Selected and at least one app has been added to the blocking list.
|
Setting |
Recommended |
|
1. Show app and profile configuration progress |
Yes. The master switch. All other settings are hidden until this is Yes. |
|
2. Show an error when installation takes longer than specified number of minutes |
Yes. Set to 60 min. Increase to 90 min for large app deployments or slow WAN links. |
|
3. Show custom message when time limit or error occurs |
Yes. Replace the default text with your Helpdesk number or support portal URL. |
|
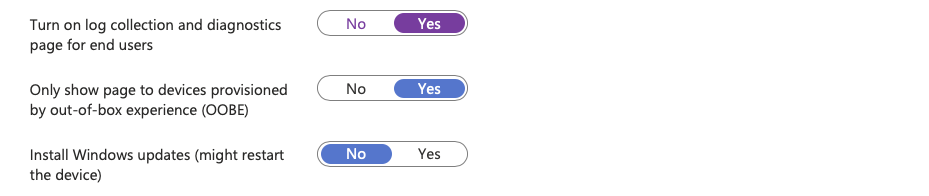
4. Turn on log collection and diagnostics page for end users |
Yes. Lets users collect diagnostics without IT being physically present. |
|
5. Only show page to devices provisioned by out-of-box experience (OOBE) |
Yes for Autopilot-only environments. Set No only if non-OOBE devices need to see the ESP. |
|
6. Install Windows updates (might restart the device) |
Yes if you want devices fully patched before first use. No if provisioning time is a hard constraint and you rely on Update Rings for patching. |
|
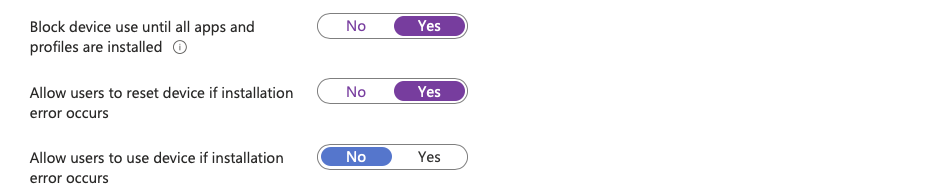
7. Block device use until all apps and profiles are installed |
Yes. The most important security control in the ESP. Without this, all other settings are advisory only. |
|
8. Allow users to reset device if installation error occurs |
Yes. Gives users a self-service recovery path. Pair with a clear custom error message instructing them to call IT first. |
|
9. Allow users to use device if installation error occurs |
No. Do not allow users to bypass a provisioning failure on corporate devices. |
|
10. Block device use until required apps are installed if they are assigned to the user/device |
Selected. Choose only security-critical apps. “All” blocks provisioning on every Required app, including slow ones. |
|
11. Only fail selected blocking apps in technician phase |
Yes. Prevents the technician phase from failing on apps that are not applicable to that phase. |
Setting 1: Show App and Profile Configuration Progress
The master switch. When set to No, the ESP screen is not displayed the device completes provisioning without showing any progress, and no blocking occurs regardless of any other settings. All remaining settings on the page are hidden until this is set to Yes.
When set to Yes, the ESP is displayed during both phases (Device Setup and Account Setup). Users see which apps and profiles are being installed alongside a progress indicator.
Recommendation: Yes for all corporate Autopilot deployments.
Setting 2: Show an Error When Installation Takes Longer Than Specified Number of Minutes
The ESP timeout. If provisioning does not complete within this number of minutes, the ESP stops and shows an error screen. The device does not continue automatically the user is presented with recovery options based on settings 8 and 9.
Setting this too low is the most common cause of ESP failures in the field. A timeout of 15–30 minutes looks conservative but is easily breached on a slow connection. Microsoft 365 Apps alone can take 20–30 minutes to deploy on a poor link. When the timeout is hit, users see an error code with no context, and your helpdesk gets a call.
Setting this to 0 removes the timeout entirely and the ESP waits indefinitely. Avoid this in production as it can leave a device stuck permanently if an app fails silently.
Recommendation: 60 minutes for standard deployments. Increase to 90 minutes if you deploy large apps or if devices provision over slower WAN connections.

Setting 3: Show Custom Message When Time Limit or Error Occurs
When set to Yes, the text in the field below the toggle is displayed on the ESP error screen above the error code. Intune pre-fills the field with a generic placeholder. You should replace this with something actionable a helpdesk phone number, email address, or support portal URL.
Example: “Unfortunately, the setup process has encountered an error and could not complete. Please contact IT Support for assistance with resolving this issue.”
A user who sees a specific instruction alongside an error code is in a far better position than one facing a hex code and no guidance.
Recommendation: Yes. Update the text with your organisation’s helpdesk contact details. Keep it to two lines maximum.

Setting 4: Turn On Log Collection and Diagnostics Page for End Users
When set to Yes, a “Collect logs” button appears on the ESP error screen. Clicking it runs the MDMDiagnosticsTool and packages Intune Management Extension logs, MDM event logs, registry snapshots, and related files into a ZIP archive that the user can send to your Helpdesk.
This is particularly useful when devices are shipped directly to remote users. The user can collect and share logs themselves without needing an on-site technician. The diagnostic package contains everything a support engineer needs to identify why provisioning failed.
Recommendation: Yes. The collection is harmless and can save significant troubleshooting time.
Setting 5: Only Show Page to Devices Provisioned by Out-of-Box Experience (OOBE)
When set to Yes, the ESP is shown only on devices going through the OOBE which covers every Autopilot device on first boot. Devices that enrol through other paths (bulk enrolment, manual MDM enrolment on an already-configured device) do not see the ESP.
When set to No, the ESP can also appear on non-OOBE enrolments. This is relevant in mixed environments where both Autopilot and non-Autopilot devices enrol into the same device groups.
Recommendation: Yes for Autopilot-only environments. Showing the ESP to a user on a device that is already set up and re-enrolling is confusing and serves no purpose.
Setting 6: Install Windows Updates (Might Restart the Device)
When set to Yes, the ESP triggers a Windows Update scan and installs any pending quality updates during the Device Setup phase. If updates are found, they are downloaded and installed potentially including one or more restarts. The device remains at the ESP screen throughout and provisioning continues after restart.
The benefit: devices arrive at the end user fully patched. A device that has been sitting in a warehouse for several months can have a substantial backlog of cumulative updates, feature updates, or driver updates. Installing them during provisioning means the device is compliant from the first login, rather than entering a patching cycle in the background.
The trade-off: update installation adds time to provisioning. On a device with a large update backlog, this can extend the Device Setup phase by 30–60 minutes and trigger multiple restarts all while the device sits at the ESP screen.
Recommendation: Yes if you want devices fully patched before first use and your ESP timeout is set generously (90 minutes or more). Set to No if provisioning time is a hard constraint and you have a reliable Update Ring policy that will patch devices promptly after their first login.
Setting 7: Block Device Use Until All Apps and Profiles Are Installed
The most consequential setting in the ESP. When set to Yes, the device is held at the ESP screen until every tracked app and profile has successfully installed, or until the timeout (setting 2) is reached. The user cannot access the desktop or use the device during this time.
When set to No, the ESP is in display-only mode. Users see progress but can click past it at any time. Apps and policies continue installing in the background but the user can start working on an incomplete device immediately.
The case for Yes: security-critical configurations endpoint protection, encryption, compliance policies must be in place before a user starts working. A device that reaches the desktop without an endpoint security agent enrolled is a risk, particularly if the user immediately connects to corporate resources.
The case for No: blocking means a provisioning failure blocks the user entirely. If the timeout is too short or an app is failing, the user is stuck. For BYOD or low-risk deployments, this is disproportionate.
Recommendation: Yes for all corporate-managed devices. Pair it with a realistic timeout (setting 2), a meaningful custom error message (setting 3), and log collection (setting 4) so users have options if something goes wrong.
Setting 8: Allow Users to Reset Device If Installation Error Occurs
When set to Yes, a “Reset device” button appears on the ESP error screen. Clicking it factory resets the device, which then re-enters the Autopilot OOBE and starts provisioning again from scratch. This gives users a self-service recovery path when provisioning has failed in a way that cannot be easily recovered.
When set to No, there is no Reset button. A user facing an unrecoverable provisioning error has no options and an IT technician must intervene to reset or repair the device.
Risk: an impatient user might hit Reset simply because provisioning is taking a long time, not because anything has actually failed. This restarts the entire provisioning process and can generate duplicate device records. Mitigate this with a clear custom error message (setting 3) telling users to call IT before they hit Reset.
Recommendation: Yes. Leaving a user with no recovery path is worse than the occasional unnecessary reset. Use the custom error message to manage expectations.
Setting 9: Allow Users to Use Device If Installation Error Occurs
When set to Yes, a “Continue anyway” button appears on the ESP error screen. The user can bypass the failed installation and reach the desktop immediately. The failed items continue attempting to install in the background.
When set to No, there is no bypass button. The user cannot skip past a provisioning failure and they must either wait for IT to resolve the issue or (if setting 8 is Yes) reset the device.
When set to Yes the user reaches the desktop with an incomplete configuration. Depending on what failed, this might mean no endpoint security agent, no compliance policy, or no access to corporate resources. For a corporate device, this defeats the entire purpose of blocking provisioning.
Recommendation: No for corporate-managed devices. If you are blocking the ESP (setting 7 = Yes), the intent is to guarantee a complete configuration before first use. Allowing bypass undermines that. Reserve Yes for BYOD or non-critical scenarios.
Setting 10: Block Device Use Until Required Apps Are Installed If They Are Assigned to the User/Device
Controls which apps must complete installation before the device is released from the ESP.
All – Every app assigned as Required to the device or user must finish before the ESP releases the device. In practice this is almost always the wrong choice. A single slow or failing optional app holds the entire provisioning process hostage. Any Required app subsequently added to the device group automatically becomes a blocking app without any deliberate decision to make it one.
Selected – Only the apps you explicitly list must complete before the device is released. All other Required apps continue installing in the background after first login. This gives precise control over what genuinely needs to be in place before the device is usable.
When using Selected, only include apps that are critical for security or immediate usability:
- Your endpoint security agent for example, Sophos Central, Defender for Endpoint (if deployed as a Win32 app rather than via the EDR connector policy)
- A VPN client, if users cannot access corporate resources without it during initial setup.
- A device registration or certificate agent required for compliance evaluation to run.
- A single line-of-business application the user absolutely cannot work without from day one.
Do not add Microsoft 365 Apps, Teams, or other large productivity suites to the blocking list. These are important but not so critical that provisioning should fail if they take 25 minutes on a slow connection. They will continue installing in the background after first login.
| Note: Every app you add to the Selected list increases provisioning time and the risk of a blocking failure. If you list four apps and one fails, the device is blocked. Start with the minimum set of genuinely critical apps and review the list whenever you add a new Required app to your Autopilot device groups. |
Recommendation: Selected. Keep the blocking list short and deliberate.

Setting 11: Only Fail Selected Blocking Apps in Technician Phase
This setting controls how the ESP handles blocking apps during the Pre-Provisioning Technician Flow (White Glove). During the technician phase, only device-targeted apps are processed and user-targeted apps do not install because there is no user context. Without this setting, a user-targeted app in the blocking list would cause the technician phase to report a failure, even though that app was never going to install in that phase.
When set to Yes, the ESP only treats a blocking app as a failure in the technician phase if that app was actually applicable to the technician phase. An app assigned to a user group is not applicable in the device phase so if it fails to install, it is not counted as a failure in the technician flow.
When set to No, any blocking app that fails to install regardless of whether it was applicable to the technician phase causes the ESP to report an error and prevent the technician from resealing the device.
In practice this matters most in Pre-Provisioning environments where your blocking list includes apps that target users rather than devices. With this set to Yes, the technician flow completes successfully based on device-targeted apps, and user-targeted apps are handled during the Account Setup phase after first user login.
Recommendation: Yes. This prevents the technician flow from failing on apps that were never intended to install during device provisioning, making your Pre-Provisioning deployments more reliable.
Assigning and Prioritising ESP Profiles
Assign ESP profiles to Entra device groups. When a device matches multiple profiles, the profile with the lowest priority number wins (priority 1 = highest). To change priority, go to Devices > Windows > Enrollment > Enrollment Status Page, open the profile, select Properties, and update the Priority field.
The default ESP profile always has the lowest priority and acts as a fallback. It cannot be deleted or given a custom priority number.

Troubleshooting
IME Logs
- Path: C:\Program Files (x86)\Microsoft Intune Management Extension\Logs
- IntuneManagementExtension.log -Primary Intune agent log
- AgentExecutor.log – Installer output and exit codes
ESP Provisioning Log
C:\Windows\Temp\IntuneManagementExtension\Logs contains the ESP’s own tracking log. It shows which items the ESP was monitoring, completion timestamps, and exactly where it stopped. This is more useful than the IME log for understanding timeout causes.
Enrollment Failures Report
Devices > Monitor > Enrollment failures shows phase, step, and error code for each failed provisioning attempt. Filter by date and search by device name or serial number.

Common Error Codes
- 0x800705B4: timeout. The ESP hit the time limit before all tracked items finished. Increase setting 2 or shorten the blocking app list (setting 10).
- 0x80070002: item not found. Usually a targeting issue the app is in the blocking list but not assigned to the device group being provisioned.
- 0x87D1041C: app not detected as installed. The installer ran but the Win32 detection rule did not confirm success. Check the detection script or file/registry rule.
- 0x80070032: device does not meet app requirements. Check the app requirement rules for OS version, architecture, or disk space mismatches.
https://learn.microsoft.com/en-us/intune/device-enrollment/windows/setup-status-page